 |
 |
 |
 |
| |
|
||||
LynxOS Networking Guide |
|||||
TCP/IP
LynxOS supports TCP/IP (Transmission Control Protocol/Internet Protocol) networks. By default, TCP/IP is installed during the initial installation of LynxOS. TCP/IP can be configured, installed, or removed at any time.
LynxOS TCP/IP is an enhanced version of the FreeBSD 4.2 TCP/IP stack, and includes support for the BSD socket interface system and networking library functions needed to access the TCP/IP and UDP network protocols. The LynxOS TCP/IP stack is enhanced for real-time determinism and performance.
Installing/Removing TCP/IP Support
TCP/IP can be installed or removed after initial installation of LynxOS. Scripts are provided to install or remove TCP/IP support. The Install.tcpip and Uninstall.tcpip scripts are found in /usr/bin.
Installing TCP/IP
Configuring Ethernet Cards with ifconfig
ifconfig is used to assign an address to a network interface for each interface present on the system. (This is handled automatically if LynxOS is installed with network support.) ifconfig can be issued as a command to reconfigure the network interface or to obtain configuration information.
To use ifconfig to configure a network interface, the command should be placed in /net/rc.network (see rc.network below for more information on this file) in order for the network interface to be properly configured at boot time.
Issuing an ifconfig command without parameters displays the current configuration information of the network interface. Refer to the ifconfig man page for more information.
rc.network
The rc.network file contains command scripts that configure the network interface card and start other network related services. rc.network contains ifconfig entries for all network interface drivers supplied by LynxOS. To use one of the entries, enable it by removing the comment character and supply the appropriate host name and IP address.
To use a network interface driver not supplied with LynxOS, insert an ifconfig entry into rc.config specifying device driver file name, host name, and IP address.
Use rc.network also to enable or disable network services such as NFS and SNMP for example.
Common TCP/IP Utilities
The following table lists common LynxOS TCP/IP commands and files:
For more information on these components, see the appropriate man pages.
The next sections provide an overview of some of the most common TCP/IP utilities. These sections introduce basics of common TCP/IP utilities such as the ping command, remote computer access (telnet, rlogin) and file transfer between computers (ftp).
Testing TCP/IP (ping)
The simplest way to test the TCP/IP configuration of the system is to use the ping utility. Users can send a test message to any host on the network with the ping command. Users can ping either the IP address or host name of the machine. This test verifies the correct operation of hardware and TCP/IP software connecting the hosts. The ping command continues to send packets to the addressed host once every second until the command is terminated with a Ctrl-C.
The following figure shows the ping command testing TCP/IP configuration by sending data packets to the IP address of a system:
Testing TCP/IP with pingThe following figure shows the ping command testing TCP/IP configuration by sending data packets to the hostname of a system.
Using ping to test TCP/IPOnce the correct host setup is verified, every host on the network can use the ping command on other members of the network as shown in the following figure
.
Pinging Other Hosts on a Network
Troubleshooting ping
Problems related to testing TCP/IP configurations with ping sometimes occur due to host lookup failures, or problems in connectivity between the systems, not necessarily with the TCP/IP configuration on the local system.
The /etc/hosts File
Host lookup failures with ping can sometimes be attributed to incorrect /etc/hosts, or /etc/resolv.conf files. For example, if the host named fish in the /etc/hosts file is not defined, the ping command fails as shown in the following figure.
Host Not Defined in /etc/hostsBecause the hostname fish is not defined on the local system, ping returns a host name lookup failure. The /etc/hosts file provides a means of mapping IP addresses to hostnames. However, in larger networks, a Domain Name Service (DNS) server is typically used. The DNS server maintains a database of hostnames and IP addresses. If a user pings a system that is not defined in a local /etc/hosts file, the system then sends a request to a DNS server to translate the hostname to the IP address.
However, a preferred method to test TCP/IP functionality is to first ping the IP address of a system, then attempt to ping the hostname of a system. If the IP address of a host is found, but the host name lookup fails, TCP/IP is correctly configured, but the hostname resolution needs to be corrected. To resolve the hostname lookup failure, the correct IP address and hostname must be added to the /etc/hosts file.
The following table shows an example /etc/hosts configuration file:
/etc/hosts example fileIn this example, the localhost entry is called a "loopback" address, and is used to point to the local system. An entry also exists for the IP address and hostname of the local system. Any other IP address and hostname definitions point to other systems on the network.
The /etc/resolv.conf file
In addition to the /etc/hosts file, the /etc/resolv.conf file provides the domain name for the local system, domain search paths used when looking up hosts, and IP addresses for Domain Name Service (DNS) servers.
Users can ping a host without providing a domain name by entering the following command:
If fish is not defined in /etc/hosts, the local system uses the search paths and DNS servers provided in /etc/resolv.conf to determine a fully-qualified domain name and IP address. The system uses the search entries in the resolv.conf file to determine a fully qualified domain name, for example, fish.domain1.com. For the system to find the IP address of a host, it must have access to one or more DNS servers. These DNS servers contain indexes of fully qualified domain names and valid IP addresses.
The structure of the /etc/resolv.conf file is as follows:
/etc/resolv.conf example file:In this example, the domain definition provides the domain of the local system. If the hostname is stingray, for example, the fully qualified hostname would be stingray.domain1.com.
The search definitions provide a means to resolve the fully-qualified domain name for hosts. For example, a system searching for the host fish first attempts to resolve the fully qualified domain name to the first search entry, or fish.domain1.com by sending a request to the local DNS server. If no entry exists in the DNS table for the system fish.domain1.com, the local system resolves the fully qualified domain name to the second search entry in resolv.conf, or fish.domain2.com. A second request is sent to the DNS server for the IP address of fish.domain2.com. This process continues until a valid host and domain is found or there are no more search paths. There is no limit to the number of search paths that can be used in /etc/resolv.conf.
nameserver definitions in /etc/resolv.conf are IP addresses pointing to local DNS servers. These DNS servers are used to translate the fully qualified domain name to a valid IP address.
ping Not Responding
If the ping command fails to respond with any output, terminate the program by pressing Ctrl-C. Common reasons for ping failure include:
- The machine orca is not connected to the network.
- The machine orca is down or powered off.
- The /etc/hosts file on shark has the wrong Internet address for orca.
- TCP/IP is not properly configured for orca.
Using traceroute
The traceroute utility is used to follow the route an IP packet takes to reach its destination. By sending simple UDP probe packets, traceroute displays the names and response times of the different gateways a packet traverses before reaching its destination. The traceroute syntax is as follows:
Where <host> is the hostname or IP address of the destination system. Additional usage information is available in the traceroute man page.
Additionally, traceroute6 can be used to follow the route of an IP packet through IPv6 networks.
Logging On to a Remote Computer (telnet, rlogin)
Users can log on to another host on the network using either one of the two utilities supplied with TCP/IP:
telnet
The telnet utility allows users to log on any type of computer that supports TCP/IP. The computer can run any operating system, UNIX-compatible or not. This utility allows a LynxOS user to access a system from anywhere on the network.
telnet is invoked with the host name of a remote computer, as shown in the following figure.
Using telnet to Remotely Log inTo access the system, users must supply a user name and password.
Terminate a telnet session by logging out of the system with the exit command, as shown in the following figure.
Terminating a telnet Session
rlogin
Users can use rlogin to remotely log on another computer similar to telnet. Unlike telnet, rlogin requires the host computer to have a UNIX-compatible operating system.
rlogin is invoked with the host name of the remote computer, as shown in the figure below:
Using rloginIn the previous example, no user name is passed to rlogin. In this case, the user name on the local machine is used to log on the remote machine, for example, user jones on host shark logged on remote host orca as user jones.
If the user wants to log on to a system that does not have an identical user account, the login argument, -l followed by the desired user account must be added, as shown in the following figure.
Remote Log in as Another UserUnlike telnet, the rlogin utility lets users take advantage of the information in /etc/hosts.equiv and.rhosts files. Users on machines that are set up to be considered local are not prompted for a password.
Executing Commands Remotely (rsh)
Another utility included with TCP/IP is rsh, the remote shell command. This utility allows users to perform the following tasks:
Accessing Remote Hosts and Redirecting
Output to the Local MachineThe rsh command only works when the user is considered equivalent on the local and remote machine.
The syntax for the rsh command is as follows:
An optional user name can be given to execute the command as a specific user. This is useful if the current user account is not considered equivalent on the remote machine. rsh redirects standard input, standard output, and standard error from the remote machine to the local host.
The who utility displays users who are currently logged into a remote host, as shown in the following figure.
Using who to Query Log ins on a Remote System
Executing a Command on a Remote Host
Also, commands can be invoked on a remote host as another user. In the following figure, user jones on host orca invokes the whoami command. This utility reports the current login account.
Using rsh to Remotely Execute a Utility
Transferring Files Between Machines (ftp, tftp rcp)
There are several ways to copy files between hosts:
File Transfer Protocol (ftp)
The File Transfer Protocol, or ftp allows users numerous configuration options. In addition to the options provided in this document, review the ftp man page for setting advanced options.
Starting ftp
In its simplest invocation, ftp is called with the host name of the remote machine. ftp prompts for a user login and password. A password must be provided to access user accounts.
In the following figure user davis on host orca connects to host shark and logs on as user jones.
Connecting to a System with ftp
Retrieving Files from a Remote Host (get)
Once logged in, files can be retrieved from the remote host using the get command, as shown in the following figure.
Downloading Files with ftp
Sending Files to a Remote Host (put)
Alternatively, files can be sent to the remote host using the put command, as shown in the following figure.
Uploading Files with ftp
Transferring Binary Files
To transfer binary files, the transfer mode must be changed by entering the binary command at the ftp prompt. For example:
Transferring a binary file in ASCII mode results in a corrupt file. To preserve the integrity of the file, be sure to set FTP to binary mode before the transfer. Note that Binary file transfers are a little slower than ASCII file transfers.
Listing ftp Commands
ftp commands are displayed by entering a question mark (?) at the ftp prompt. The following list describes some common ftp commands
Trivial File Transfer Protocol (tftp)
tftp (Trivial File Transfer Protocol) is a simple UDP transfer protocol. Typically, tftp is used for bootstrapping diskless clients and installing firmware into ROM.
tftp does not require client authentication, which may pose a security risk for some systems. LynxOS supports two tftp transfer methods: Simple and Secure.
- Simple: The client can access the entire file system. This is a simpler configuration, but it presents a larger security hole (anyone can access the password file). In Simple mode, only files open to the public can be read.
Simple is the default tftp mode. No options are required:
- Secure: Secure mode allows tftp access for a single directory. When invoked, the TFTP server uses a chroot(2) system call to change its root directory. All other directories are inaccessible to the client. Because of the chroot(2) system call, tftpd must be run as root. Additionally, secure mode allows for a particular user to be specified with the -u option.
Secure tftp is set with the -s option and a directory name. For example, to set up the directory /tmp/project for secure tftp for the user fred, use the following command:
For more information, see the tftpd(8) man page.
Remote Copy (rcp)
The remote copy command or rcp is an efficient way to exchange data between UNIX-compatible hosts. To access files using rcp, users must have already set up the /etc/hosts.equiv and .rhosts files correctly. Files can be copied between hosts using a syntax similar to the UNIX cp command.
The only difference is that the remote host's file name must be indicated properly. In the following example, file /etc/hosts is copied from host orca to host shark:
Like the cp command, multiple files can be transferred to a directory:
Finally, the rcp command can be used to transfer files between two hosts that are different than the host currently logged into (assuming proper configuration).
In the following example, the /etc/passwd file is copied from host orca to host fish from a user on host shark:
Divert Sockets
divert provides a kernel packet diversion mechanism. Divert sockets are similar to raw IP sockets except that they can be bound to a specific divert port with the bind system call. A divert socket bound to a divert port receives all packets diverted to that port.
Divert sockets are normally used in conjunction with packet filtering. By reading from and writing to a divert port, matching packets can be passed through a filter as they travel through host machine. For more information refer to the divert(4) and bind(2) man pages.
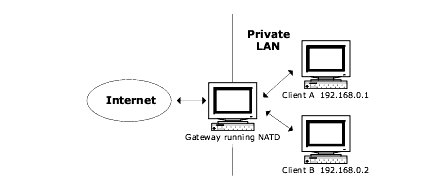
NAT and IP Masquerading
IP masquerading is a form of NAT (Network Address Translation) that can be implemented in conjunction with the natd daemon.
This feature allows internally connected computers that do not have registered Internet IP addresses to communicate to the Internet by way of natd running on a LynxOS host gateway that has a registered Internet IP address.
Network Address Translation can be used to redirect an IP access to a particular client, or redirect specific internet services to a particular client and port.
Network Address Translation
Enabling and Starting natd
Once natd is enabled in the kernel, start the daemon with the proper configuration options. natd syntax is as follows:
The following table describes the redirection options used with natd:
For example, two clients, Client A (192.168.0.1) and Client B (192.168.0.2) are connected to a gateway. IRC services (port 6667) are required for ClientA, and HTTP services are required for ClientB (port 80). To configure natd to redirect incoming packets to these ports, enter the following commands:
Additional configurations and options are available in the natd(8) man page.
IPv6 Support
The IPv6 protocol addresses technical limitations of IPv4. Most notably is the increase IP address space, which has changed from 32 to 128 bits per address.
IPv4 32-bit addresses are represented in dotted-decimal format divided along 8-bit boundaries. IPv6 IP addresses are 128-bit address divided along 16-bit boundaries, and each 16-bit block is converted to a 4-digit hexadecimal number and separated by colons. For example:
The IPv6 address representation can be further simplified with features such as leading zero suppression and zero compression. Detailed information on these features as well as other information regarding the IPv6 addressing architecture are described in RFC 2373.
Other notable improvements is the inclusion of the following services that were optional under IPv4:
- Autoconfiguration-IPv6 specifies a stateless host autoconfiguration mechanism which is an improvement on the optional DHCP mechanism used with IPv4.
- Security-IPv6 mandates support for IPsec. This guarantees that a secure IP connection can be established when communicating with IPv6 devices.
- Multicast-Muliticast is now mandatory under IPv6.
In addition, IPv6 has simpler packet header structures and also introduces a protocol header chain that allow for more flexible protocol extensions
Additional information on the specifications of IPv6 can be found at www.ipv6.org.
Setting an IPv6 Address Statically
Use the following steps to configure and test the system for assigning a static IP address. It is important to note that manually setting and maintaining IPv6 IP addresses can be complicated. Due to the complex nature of address notation, mistakes are more likely to occur with IPv6 than IPv4. Users are cautioned to double check addresses set manually.
- Update /etc/hosts to include the IPv6 loopback address, the IPv6 address for the host, and an external IPv6 host address.
Example IPv6 /etc/hosts file
- Assign an interface an IPv6 address with ifconfig. Note that for IPv6 addresses, the switch inet6 must be used:
Setting up Hostname Resolution for IPv6 Addresses
Hostname resolution is configured by the /etc/resolv.conf file. IPv6 addresses can be used along with IPv4 address to perform hostname resolution. The following provides an example resolv.conf file:
Example IPv6 resolv.conf file
Setting up Routes with route6d
The route6d daemon is an extension of routed that includes support for RIP over IPv6. Refer to the route6d(8) man page for syntax and usage information. Additionally, other routing demons that support IPv6 can be used; zebra, for example. For additional information, see the GNU Zebra User's Guide.
Using faithd to Connect IPv6 and IPv4 Networks
The faithd daemon is used to provide a IPv6 to IPv4 relay. faithd performs TCP relay similar to firewall gateways, but with the addition of address translation. faithd is used only to translate IPv6 addresses to IPv4.
The following provides an example of setting up and configuring faithd relay for telnet. On the translating router where faithd runs, perform the following:
# sysctl -w net.inet6.ip6.accept_rtadv=0
# sysctl -w net.inet6.ip6.forwarding=1
# sysctl -w net.inet6.ip6.keepfaith=1
# ifconfig faith0 up
# route add -inet6 3ffe:501:1234:ffff:: \
-prefixlen 96 ::1
# route change -inet6 3ffe:501:1234:ffff:: \
-prefixlen 96 -ifp faith0
The first argument is a service name for TCP relay. The service can be specified either by the port number (23) or by service name (telnet). The second argument is a path name for the local IPv6 TCP server. If there is a connection to the router itself, this program is invoked.
Note that faithd must be invoked for each service required.
Hostname Resolution Between IPv6 and IPv4 Hosts
The simplest way to translate an IPv4 address to IPv6 address is to add an entry to the /etc/hosts file. On the IPv6 host, add a line that resolves the IPv6 and IPv4 addresses:
/etc/hosts example
Driver Defaults
The following table shows the default values within the driver information files. These files are located in /sys/devices.
To change the defaults, edit the file, compile it, and install TCP/IP support again. For more information, see "Installing/Removing TCP/IP Support"
Additional Device Drivers may be included with the LynxOS ODE or BSP packages. Refer to the driver file or man page for additional tunable information.
For specific information on adding device drivers to a LynxOS system, please refer to the LynxOS User's Guide.
Additional information on creating device drivers is available in the book Writing Device Drivers for LynxOS.
|
LynuxWorks, Inc. 855 Branham Lane East San Jose, CA 95138 http://www.lynuxworks.com 1.800.255.5969 |
| |
|
|
|