 |
 |
 |
 |
| |
|
||||
LynxOS Installation Guide |
|||||
X Server Configuration
This chapter explains how to use the configX utility to configure the X server.
Overview
After installing X on the system, the X server must be configured. The minimal steps required to configure the X server include:
Other steps, covered later in this chapter, may be required based upon the special features, options, and/or configuration requirements of the system.
Navigating configX
This section describes how to use the automated configuration utility, configX, to configure the X server on the system. Additionally, configuration files can be manually edited. This chapter only shows usage of the configX utility.
Using a Mouse or Special Keys
The configX utility is a graphical program that can be navigated with a mouse. However, users can also use the keyboard to move through the various menu options. This section describes how to add mouse support to configX, and provides a list of keys to navigate different fields.
Using a Mouse with configX
If using a mouse with configX, configure it before running the utility. During the X & Motif installation, a pointing device can be selected to be used with configX. If no pointing device is selected, use the following instructions to add mouse support to configX.
- If X is already installed on the system, the Install.XM script adds a third option in the Main Menu, Miscellaneous Admin. Select option 3, Miscellaneous Admin.
- Select Option 1, Change Mouse selection for use with configX utility and follow the prompts.
- Once the new mouse is configured, the Install.XM script exits.
- Restart configX:
This procedure can be repeated until the mouse is properly configured.
Starting X Server Configuration
The configX utility is installed in the /usr/bin/X11 directory. To start configX, use the following instructions:
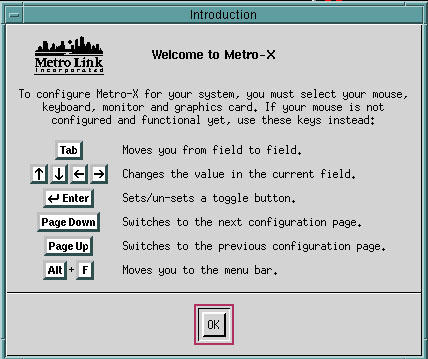
An explanation of special keys appears. (This message only appears prior to the initial configuration of X when no XMetroconfig file exists.) These keys can be used if the system mouse is not yet configured.
Using the Keyboard with configX
The keyboard can be used to navigate through the configX menus. These keys are described in the following table.
Mouse Configuration
If the default mouse is not correct for the system, change the configuration with the following instructions.
- Press Down arrow to display the list of mice.
- Press Up arrow or Down arrow to scroll to a mouse type, and press Enter.
- Press Tab to move to the next field.
- Press Down arrow to display the list of mouse buttons. (The default entry is based on the selected mouse.)
- Press Up arrow or Down arrow to scroll to the button entry press Enter.
- Press Tab to move to the next field.
- To change the path for the mouse device, edit it here.
- Press Tab to move to the next field.
To use a touch screen instead of a mouse, refer to "Configuring a Touch Screen", for set up and calibration instructions.
For a PS/2 type mouse, select one of the PS/2 mouse-specific entries, i.e., Microsoft PS/2 Intellimouse, or PS/2 Compatible.
Keyboard Selection
X includes international keyboard support, which allows users to select the keyboard appropriate for a language and country.

The initial keyboard setting is Default: Use default console mapping, which works with most keyboards. To select a keyboard, use the following instructions.
- Press Down arrow to display the list of keyboards.
- Press Up arrow or Down arrow to scroll to the keyboard entry and
press Enter.
- Press Tab to move to the next field.
Descriptions of English USA Keyboards
There are four US keyboards listed in configX. If using a US English keyboard, select the right one for the system:
- English: USA / Standard PC keyboard--This is a standard 102-key U.S. English keyboard. (This is equivalent to the English: Canada
keyboard type.)
- English: USA / Microsoft keyboard--If a keyboard has the extra Windows and Menu keys on the bottom, choosing this keyboard allows these keys to be used in X programs. While X programs are not typically set up to use these keys by default, the Xt translation table feature can be used to customize the keyboard commands in most X programs. The Windows key is bound to the Meta modifier, and the Menu key uses the key symbol Menu.
- English: USA / Keytronic FlexPro keyboard--Use this setting only if you have a Keytronic FlexPro keyboard.
- English: USA / with ISO9995-3--This keyboard type allows users to type special characters used in non-English languages from a US English keyboard. When this keyboard type is selected, the right Alt key becomes a "mode switch" key. Holding down this key while typing other keys on the keyboard creates special characters.
Monitor Configuration
Use the Monitor Configuration page to configure monitor settings, adjust the image (after editing and saving the configuration), and set the timing of the screen saver.
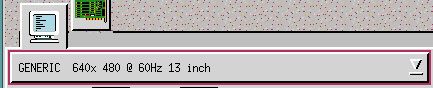
Use the following instructions to change the default monitor:
- Press Down arrow to display the list of monitors.
- Press Up arrow or Down arrow to scroll to the system monitor entry, then press Enter to select it. If the monitor is not listed, use a generic entry that best matches the monitor's capabilities.
- Press Tab twice to move to the Screen Width field. (Bypass the Adjust Image button until after configuring the monitor. See "Adjust Image (Timing Editor)".
- To change the screen width (mm), edit it here.
- Press Tab to move to the next field.
- To change the screen height (mm), edit it here.
- Press Tab to move to the next field.
Some graphics cards and monitors support the Display Power Management System (DPMS), minimizing power consumption. If the hardware supports this feature, the phases of DPMS can be controlled in this section. The typical DPMS setup has a cascade effect, with the various phases being activated in succession with a choice of delay times between each.
- X Screen Saver--Preliminary phase to DPMS, which blanks the screen but provides no power reduction
- Standby Mode--First phase of DPMS, which provides moderate power reduction by disabling the horizontal sync signal to the monitor
- Suspend Mode--Second phase of DPMS, which provides significant power reduction by disabling the vertical sync signal to the monitor
- Monitor Off--Final phase of DPMS, which provides maximum power reduction by disabling both the horizontal and vertical sync signals to the monitor
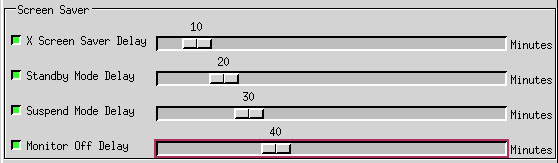
Screen Saver
To set the screen saver, use the following instructions:
- In the X Screen Saver Delay field, press Enter to toggle this option.
- If toggled on, press Tab to move to the Minutes field, then use Left arrow or Right arrow to set the value.
- Press Tab to move to the next field.
- In the Standby Mode Delay field, press Enter to toggle this option on or off.
- If toggled on, press Tab to move to the Minutes field, and use Left arrow or Right arrow to set the value.
- Press Tab to move to the next field.
- In the Suspend Mode Delay field, press Enter to toggle this option between on and off.
- If toggled on, press Tab to move to the Minutes field; use Left arrow or Right arrow to set the value.
- Press Tab to move to the next field.
- In the Monitor Off Delay field, press Enter to toggle this option on or off.
- If toggled on, press Tab to move to the Minutes field, then use Left arrow or
Right arrow to set the value.
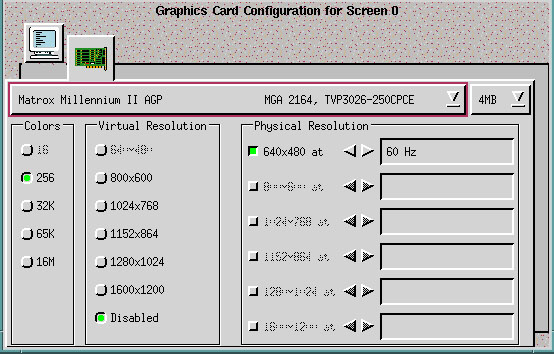
Graphics Card Configuration
Press Pg down to move to the second configuration screen, which controls the graphics card, the number of colors, the virtual resolution, and the physical resolution.

Each graphics card configuration consists of six elements:
- The graphics card make and model (The chipset used by the card is listed to the right of the card name.)
- The memory available on the graphics card
- The number of colors supported on screen simultaneously (color depth)
- The virtual resolution of the screen (width x height)
- The physical resolution of the screen (width x height)
- The screen refresh rate (Hz)
Non-interlaced mode provides a better screen appearance than interlaced refresh rates. The highest refresh rate that a monitor supports provides the best image. At higher screen resolutions a higher refresh rate is particularly important to prevent the screen from visibly flickering.
A refresh rate of 60 Hz is selected by default. This can be increased if the graphics card and monitor support it.
The default graphics card setting is IBM VGA. To configure the graphics card, use the following instructions:
- Press Down arrow to display the list of graphics cards.
- Press Up arrow or Down arrow to scroll to the graphics card entry, and press Enter. Only models specifically listed are officially supported by Metro-X. If the system graphics card is not listed, select one of the generic entries with similar components (graphics chipset and ramdac).
- Press Tab to move to the next field.
Memory Selection
To select memory, use the following instructions.
- Scroll through the pull-down list of memory amounts and select the amount of memory on the graphics card in use (memory affects the availability of colors and resolutions.)
- Press Tab to move to the next field.
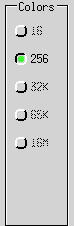
Color Selection
Not all graphics cards can support all color depths (number of colors). Only the options for the color depths supported by the card are included. Other options are grayed out.
Only one color option can be selected (due to design limitations of X).
Color options available are limited by the physical resolution(s) chosen. Not all color depths are available at high resolutions. The default setting is the lowest value for the graphics card. To select a color setting, use the following instructions.
- Press Tab to move through the color settings, and press Enter to select one. (The previous settings are cancelled.)
- Press Tab to move to the next field.
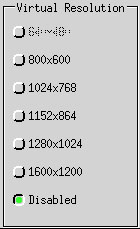
Virtual Resolution Selection
The Virtual Resolution setting provides a work area larger than the physical screen. Windows extend beyond the screen's physical boundaries and are viewed by scrolling into the extended areas. Only the options for the virtual resolutions supported by the graphics card are provided in this field. Other options are grayed out. Select the Disabled option to disable this feature.
- Only one virtual resolution can be selected.
- In some cases the virtual-resolution options available are limited by the physical resolution(s) choosen, since the virtual resolution must always be greater than the highest physical resolution.
The default setting for virtual resolution is Disabled. Use the following instructions to select a virtual resolution:
- Press Tab to move to the appropriate setting, then press Enter to select it. (The previous settings are cancelled.)
- Press Tab to move to the next field.
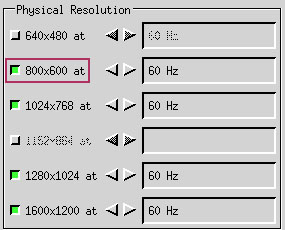
Physical Resolution
Not all graphics cards and monitors can support all physical resolutions. Only the options for the resolutions supported by your hardware are provided in this field. The other options are grayed out.
Multiple physical resolutions can be selected. Users can switch between these resolutions while running by pressing a hot-key combination:
- Press Ctrl-Alt-+ to change to the next resolution.
- Press Ctrl-Alt--(minus) to change to the previous resolution.
For only one resolution, select the Physical Resolution button.
The physical resolution(s) choosen may limit the selections in Colors and Virtual Resolution, depending on the capabilities of the graphics card.
If the word "Custom" appears after the frequency, the timing editor is used to modify a mode. See "Adjust Image (Timing Editor)". Changing the graphics card or monitor invalidates the custom modes, and the "Custom" tag no longer appears in the frequency box.
The default setting is the lowest value for the card. To enable a resolution, use the following instructions:
- Press Tab to move to the setting, and press Enter.
- Press Tab to move to the corresponding field to set the screen refresh rate (Hz) for that resolution.
- Then use Left arrow or Right arrow to select a value from the frequency options available.
Repeat this procedure for each physical resolution to set.
Font Path
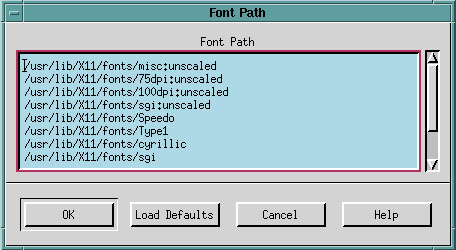
To use a font server instead of, or in addition to existing fonts, the font path within the Metro-X Configuration Utility must be updated. Use the following procedure to update the font path:
- Press Alt-c to display the Configuration pull-down menu and press Enter.
- The Font Path window appears. Edit paths as necessary for the system. Metro-X searches for fonts in the order in which the directories are listed in this file.
- If a font server is used, enter the following as the first line:
where fontserver is the name or IP address of the system. If the port number is not the default 7000, change it to the appropriate port number.
If the information is correct, select the OK button. To disregard the changes, select the Cancel button.
Multiple Screen Configuration (x86 only)

Metro-X supports up to 16 screens, all of which can be controlled simultaneously with a single keyboard and mouse. This allows users to run many applications without overlapping windows, and is particularly useful for large scale image-processing work. For users with 4 screens or less, configX can be used to configure the settings. For users with 5 to 16 screens, contact LynuxWorks technical support for specific instructions.
For each screen used, a separate configuration must be created for that screen's monitor and graphics card. The Matrox G100 Productiva Multi-Monitor is the only supported card.
Adding a Screen
Metro-X defaults to a single-screen setup. The first screen configured is labeled Screen 0. When adding a second screen, all of the configuration default settings are duplicated from the settings of Screen 0. If the hardware is the same on all screens, configuring Screen 0 before adding the other screens simplifies the setup and configuration. Similarly, as more screens are added, the settings of the currently active screen is used to set the default settings of the new screen.
When using multiple screens, the order in which the cards are probed on the motherboard (PCI/AGP bus) must match the order in which they are configured
in configX.To add a screen, use the following instructions:
- Press Alt-s to display the Screen pull-down menu.
- Type A for Add.
- The Monitor and Graphics Card icons for Screen 0 become outlines, and two full-color icons appear for Screen 1.Refer to the procedures described earlier in this chapter if any changes need to be made to the new
screen's configuration.
- Use the Pg down and Pg up keys to move to the configuration pages of each screen.
Deleting a Screen
When a screen is deleted, all screens with higher screen numbers immediately drop down one slot. For example, Screens 0, 1, and 2 are currently configured and Screen 1 is deleted. Screen 2 then becomes Screen 1, but retains its own configuration. Screens 0 and 1 are the only remaining screens.
To delete a screen, use the following instructions:
- Use the Pg down or Pg up key to activate the set of icons for the screen
to delete.
- Press Alt-s to display the Screen pull-down menu.
- Type D for Delete.
- One set of Monitor and Graphics Card icons disappears. Higher-numbered screens (if any) immediately fill the gap of the deleted screen.
Screen Layout
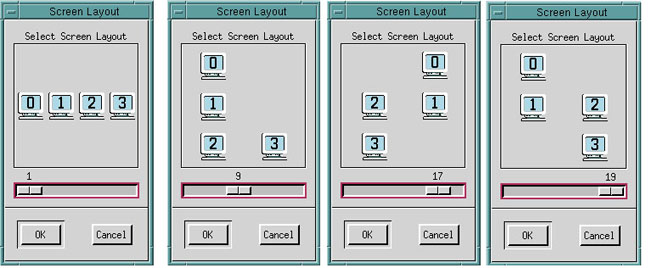
The Screen Layout window lets users specify the arrangement of multiple screens in workspaces for screen-to-screen mouse movement. To arrange multiple screens, use the following instructions.
- Press Alt-s to display the Screen pull-down menu.
- Type L for Layout.
- The Screen Layout window appears.
- Press Left arrow or Right arrow to view the various layout combinations for the number of screens.
- When the correct layout is displayed, press Enter to select it.
Configuring a Touch Screen
Users can add one touch screen for every monitor (screens 0-3) displayed in configX. Each touch screen is associated with one monitor and one graphics card.
To configure touch screens, use the following instructions:
- Select the monitor icon with which the touch screen should be associated. (The active icon is in color; inactive icons appear as maroon outlines.)
- Press Alt-t to display the Touch Screen pull-down menu.
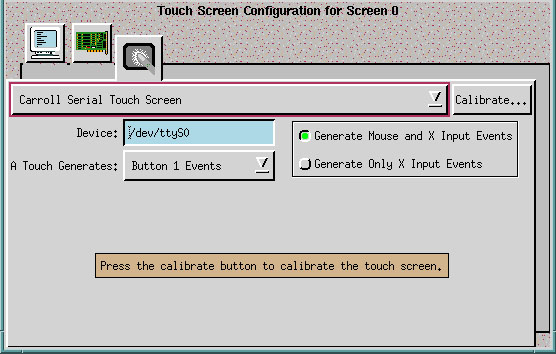
- Type A for Add. The Touch Screen Configuration page appears.
- Press Down arrow to display the list of touch screens.
- Press Up arrow or Down arrow to scroll to the touch screen, and press Enter to select it.
- Press Tab twice to move to the next field. (Bypass the Calibrate button until the touch screen configuration is complete.)
- In the Device field, enter the name of the serial device to which your touch screen is attached.
- Press Tab to move to the next field.
- Select to generate either Mouse and X Input events, or X Input events only.
- Press Tab to move to the next field.
- In A Touch Generates, press Down arrow to display the list of events.
- Press Up arrow or Down arrow to scroll to the type of button event the touch should generate, and press Enter.
The touch screen is ready to be calibrated. See the next section for details.
Touch Screen Calibration
All touch screens must be calibrated to match the display. Some touch screens are pressure sensitive, so the calibration process uses variations in pressure to distinguish between a button click or a simple move. Since touch screens vary, the calibration process must be set individually for each. To calibrate a touch screen, use the following instructions:
- Press Tab to move to the Calibrate button on the Touch Screen Configuration page then press Enter.
- A pop-up window appears with instructions and a flashing target appears in the upper-left corner of the screen.
- To re-calibrate your touch screen, click on the Re-calibrate button.
- If the calibration is correct, click OK.
Deleting a Touch Screen
To delete a touch screen, use the following instructions:
- In configX, select the icon of the touch screen to delete.
- Press Alt-t to display the Touch Screen pull-down menu.
- Type D to Delete the touch screen.
The Touch Screen Configuration page is removed.
Touch Screen Setup with No Mouse Attached
To configure a touch screen with no mouse attached, use the following instructions:
- Run configX from the command line.
- Configure the touch screen per the instructions provided in "Configuring a Touch Screen", but in the Mouse section, select No Mouse Attached.
- Save and exit from configX (see instructions in "Save and Exit").
- Edit the .xinitrc file in your home directory and add the following lines:
- Run xinit.
- This opens configX in the mode selected.
- Add the touch screen and perform the calibration.
Save and Exit
To save current settings and exit the program, use the following instructions:
The changes are saved and the Metro-X Configuration Utility closes. The system is now ready to run Metro-X.
Quit Without Saving
To quit without saving the current settings, use the following instructions:
- Press Tab to move to the No button, then press Enter to confirm exiting the Metro-X Configuration Utility without saving changes.
Adjust Image (Timing Editor)
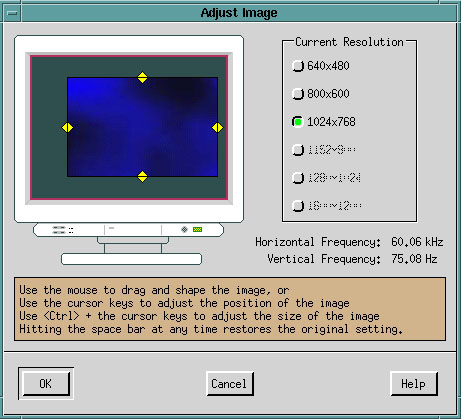
The Adjust Image pop-up window provides users the ability to change the size and position of the image display in the monitor. This is also known as a timing editor. Adjust the image for each of the physical resolutions previously selected in configX.
Adjusting the Image
In the Adjust Image pop-up window is a picture of a monitor. The blue box on the monitor's screen represents the image displayed on your own screen at the current resolution. The yellow diamonds on each side of the blue box are handles that you can use to adjust the image.
- Use the mouse to drag the image to a new position.
- Use the mouse on the handles to stretch the image to a new size.
- Use the cursor keys to move the image to a new position.
- Use Ctrl with the cursor keys to adjust the size of the image.
To adjust the image, use the following instructions:
- Activate a resolution toggle button to make it the current resolution (the screen automatically changes resolutions), and adjust the image for the current setting.
- Repeat the procedure for each resolution to use.
- Press Tab to move through the bottom buttons and press Enter to select.
Starting X
To start the X & Motif Development Package, type one of the following commands at the command line prompt: startx, xinit, or xdm (if configured). For example,
PS/2 Mouse Support
If selecting a PS/2 mouse, select the appropriate mouse name (for example: Intellimouse PS/2 or PS/2 compatible in the configX utility and select the mouse port /dev/mouse. Note that the PS/2 mouse driver must be installed in LynxOS before it is available to configX (see "Installing the PS/2 Mouse Driver" in "Installing X & Motif").
Audio Bell
The default bell tone can be changed with xset.
Default Configuration Files
Default files /.xinitrc, /.xsession, /.mwmrc, and /.X defaults are provided as part of the X distribution. These can be used as provided or can be used as examples to create custom defaults. A default resource file is provided as well.
Switching Between Resolutions
If more than one screen resolution is available, users can use a hot-key combination to change the resolution on the fly:
|
LynuxWorks, Inc. 855 Branham Lane East San Jose, CA 95138 http://www.lynuxworks.com 1.800.255.5969 |
| |
|
|
|