 |
 |
 |
 |
| |
|
||||
LynxOS Networking Guide |
|||||
SCMP
SCMP (Snugly Coupled Multiprocessing) allows multiple CPU boards connected to the same backplane (VME) to communicate with each other using the socket interface and TCP/IP protocols.
This chapter describes how to configure an SCMP environment for use with LynxOS.
Overview
SCMP splits complex applications across multiple processors resulting in faster overall computational throughput and real-time response. Some of the features of SCMP support include:
- Interprocess communication using socket interface and TCP/IP protocols.
- Availability of TCP/IP networking utilities like rlogin, rcp, and so on.
- Diskless operation with booting over the backplane and NFS for remote file access.
- Backplane NFS transport for efficient access to remote files.
- Support for up to eight VME boards on the backplane.
SCMP Concepts
SCMP functions at the data link layer in a generic networking model. Communication above the SCMP layer relies on TCP/IP protocols. To an application, SCMP connections looks like a Ethernet or SLIP connections.
The following figure shows a generic network layer model with SCMP.
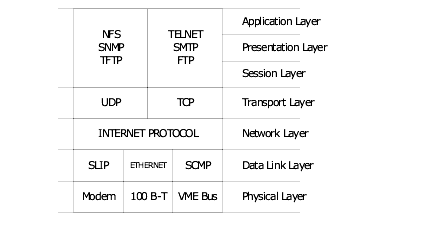
Generic Network Model based on OSI/ISOThe SCMP configuration consists of a primary processor and one or more secondary processor(s). The processor boards in the SCMP configuration can have local disks or be diskless clients.
The backplane network driver is responsible for transferring packets over the backplane. This driver provides the same interface as an ethernet driver to the TCP/IP protocol code and is implemented as a kernel thread. In this way, a cluster of processors running LynxOS can work together while sharing the common backplane. They can be configured to work on different applications or a complex application that can be split across processors. Such applications can communicate over the backplane using sockets.
The following figure shows a hypothetical configuration of VME processors that communicate via SCMP over a shared VME backplane.
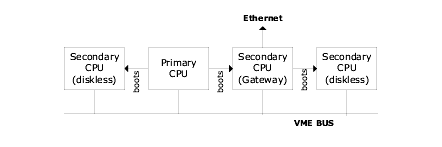
Hypothetical SCMP ConfigurationThe bus backplane is considered to be an Internet network with its own network ID and each board on the backplane is assigned a unique IP address within that network.
Configuration
When configuring an SCMP environment, it involves installing the hardware properly in the VME cage, configuring LynxOS with the appropriate information about the hardware, and initializing SCMP on the LynxOS machine.
The following sections describe these steps:
- Setting up the hardware for SCMP
- Configuring the LynxOS backplane driver for each processor
- Building a new LynxOS kernel with the backplane driver for each processor
- Modifying start-up files on the primary processor
- Starting the primary processor
- Starting the secondary processor(s).
SCMP - VME
Bus Example Used in This Chapter
For simplicity, this chapter uses an example SCMP setup (shown in the following example) to describe how to configure an SCMP environment.

Example SCMP Configuration
Setting Up the Hardware for SCMP
LynxOS SCMP supports up to eight VME boards sharing a single VMEbus. Boards of one architecture type can be included (PowerPC-only). LynxOS currently supports the following CPU boards and VME bridge chips for SCMP:
Documentation should be provided for the particular processor boards and the VME cage available during the initial setup of the hardware for SCMP. Before installing SCMP, review VMEbug commands and concepts.
Assembling the System
Select one processor board to be the system controller on the VMEbus. To do this, set the appropriate jumpers on the board (as described in the hardware manual) and place the board in slot 0 of the VME cage. Some VME chassis may require the boards to be in adjacent slots.
From the perspective of LynxOS, there is one primary processor and one or more secondary processor(s). The primary processor may or may not be the same board as the system controller.
Assigning the Board Addresses
The processor boards communicate by accessing each other's DRAM in the VMEbus A32/D32 address space. They also communicate by using the Universe SW-INT interrupt. To configure an SCMP environment, assign a unique address to each board so this communication can occur.
VME Shared Memory Basics
Each board connected to the VMEbus is assigned a unique 32bit address range for its DRAM. Using the MVME 5100 as an example, the following figure illustrates how shared memory is accessed through VME space. This example assumes there are two boards (board 1 and board 2) in the SCMP setup, both making the top 0x03FFF000 bytes of their DRAM available to the VME space.
Note that for each processor board, VME space address 0x0 is accessible at processor address 0xD0000000. Therefore in Figure 85 , where board 2's DRAM is mapped to VME address 0x04000000, it is available to board 1 at 0xD0000000+0x04000000. Similarly board 1's DRAM is mapped to VME address 0x0 and available to board 2 at address 0xD0000000+0x0.
The following figure illustrates how board 1's DRAM is mapped to VME space and where it is visible in the board 2's address space.
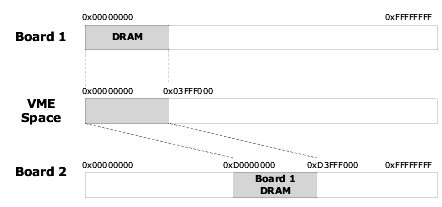
Board 1 to Board 2 Shared Memory ExampleThe following figure illustrates how board 2's DRAM is mapped to VME space and where it is visible in the board 1's address space.
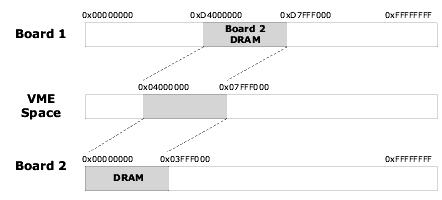
Board 2 to Board 1 Shared Memory ExampleFor each processor in the SCMP environment, select and program the following addresses into the VME device. In case of Universe chip, the VME device installed on MVME5100 and MVME 5101 boards, this requires programming the following:
Selecting the Slave Addresses
Each board also must have a unique slave address. The VME Slave Image Base Address mentioned above is the starting address in VME space where a processor board's DRAM will be mapped. The VME Slave Image Bound address determines the amount of local DRAM mapped. Once DRAM of a board is mapped to the VME space at any address, Y for example, it becomes visible to all other boards in the system at physical address 0xD0000000+Y. Note that this is valid only after the system boots with LynxOS.
Programming the VME Bridge Chip
Use the addresses in the following table to program the VME bridge chip by entering a firmware-specific command at the VMEbug monitor that modifies the environment variables. Make sure that there is no overlap in the address ranges for each board.
Programming the Universe Chip
The Universe chip must be programmed on each board with the DRAM slave addresses. For primary processor and secondary processors that are booted from the disk, firmware values for VME slave images will be overwritten by the Universe driver. Refer to /sys/dheaders/uvmeinfo.h for default values. For secondary boards that are booted over the backplane using the slaveboot utility, these values need to be programmed with VMEBug firmware (PPCBUG in case of MVME5100/MVME5101 boards). Below is an example of how the universe registers can be setup in the secondary processor to enable it for a slaveboot.
Example Settings
Set the VMEbus Slave Image 0 Control value to 0xC0F20000 for all MVME5100 boards in the configuration.
It is important to note that the MVME5100 and MVME5101 boards start in CHRP address mapping mode and when LynxOS boots up, it transitions the board to PReP mode. Therefore when programming the board's VME slave images from PPCBUG users need to do it in accordance with CHRP.
In CHRP mode the VME Slave Image Translation Offset is calculated by subtracting the VME Slave Image Base Address from 0x00000000. For example:
In PReP mode, the VME Slave Image Translation Offset is calculated by subtracting the base address from 0x80000000. For example:
The following figure uses a Slave Image Base Address Register (DRAM address) of 0x04000000. This makes the DRAM of this board available at VME address 0x04000000
Programming the Universe Chip on an MVME2600 Board
Verifying the Hardware Setup
Before beginning the software (LynxOS) phase of setting up SCMP, verify that the hardware is properly installed and configured.
A quick way to check the hardware setup is by using the md (memory dump) command at the VMEbug prompt. The following steps show how to test the example setup in this chapter.
Troubleshooting a VME Board that Uses the Universe Chip
If SCMP configuration is not working, verify the hardware in the system is correct. Check the firmware in the system as described below. Assume that there are two boards in the SCMP setup.
- On both boards in the SCMP configuration, program the following values for the PCI Slave Image #1 with the env command.
- Program the VME slave images on all boards such that DRAMs of all boards are available at unique VME addresses. Unique VME addresses assigned to top portion (64MB in this example) of DRAM on all boards must lie within the range 0x0-0x10000000. For example on board 2 program the following values into the VME slave image:
- Use the PPC1Bug md (memory dump) command to verify that the boards can access each other's memory across the VMEbus.
- Now we need to make sure the boards can see each other's Universe chip registers. On board 2, setup the following values in the VMEbus Register Access registers with the PPCBUG env command:
This should show the vendor id / device id combination of the Universe chip on board 2. Note that 0x07FFF000 is a VME address and 0x87FFF000 is the CPU address at which this VME address is visible. Similarly, board 1's Universe registers should be visible to board 2 at address 0x83FFF000.
Setting Up LynxOS for SCMP
This is the software stage of the SCMP setup. At this point, these steps must be performed:
This section assumes that LynxOS is already installed on the local disk of each VME board in the SCMP environment. If LynxOS is not installed, do so now.
Copying the Current LynxOS Kernel
Because the SCMP setup scripts change the LynxOS kernel, it is a good idea to make a copy of the current running kernel before proceeding with the scripts.
If there are problems, this copy of the kernel can be booted instead. See the preboot man page for details on booting alternate kernels.
Choosing the Primary Processor
Select the board to be the primary processor in the SCMP environment. All processor boards contains a database of information about all processors in the SCMP system. This database is contained in the /etc/bplane.conf file. The first entry in this database belongs to the primary processor. The following information is required for each processor in the system:
Set the VRAI base address in the A32 address space.
The following table provides an example of the kind of information that is required to supply for each processor:
Configuring the LynxOS Backplane Driver
The LynxOS backplane device driver must be configured for each of the processors in the SCMP environment. Complete the following steps for each processor in the system, starting with the primary processor.
Creating the Backplane Configuration File
First, create the file /etc/bplane.conf. This configuration file specifies the board ID, DRAM address, I/O address, and hostname for each board in the SCMP system. The following figure shows an example /etc/bplane.conf file.
Example bplane.conf FileThe /etc/bplane.conf fields are as follows:
- Board Type -- 9 refers to the MVME5100 and MVME5101 boards.
- Boot Flags -- Unused field; must be set to 0.
- DRAM Address -- The desired starting address for the board as specified with the env command.
- I/O Address -- CPU address where VME bridge chip registers of this board are visible.
- Hostname -- Unique IP address or hostname for each board. When using the hostname, ensure that /etc/hosts contains the hostname with its appropriate IP address.
For more information on bplane.conf file, see its man page.
Modifying the Backplane Driver Information
The parameter MAX_NO_PROCESSORS must be equal to or greater than the total number of boards on the system (eight maximum). For example:
Rebuilding the Backplane Driver Information
Rebuild the backplane driver information file by typing make in the /sys/devices directory:
Rebuilding the LynxOS Kernel
Now that the configuration files and backplane driver files are modified, rebuild the kernel to incorporate the changes:
Choose the SCMP option and answer the questions presented by the script.
This step allows the user to enable the bplane and VME chip drivers.
The VME backplane is considered to be an Internet network with its own Internet network ID. Choose a unique network address for the backplane network. Similarly, enter the corresponding Internet host IDs and hostnames for the processor boards on the backplane. These values should correspond to the values specified in /etc/bplane.conf.
Starting SCMP
After rebuilding the kernel, reboot the primary processor. This brings up the SCMP-configured kernel on the primary processor. The -N option remakes the /dev directory with the device bplane added.
# reboot -aN
If the primary processor is disk-based and is exporting file system for the secondary processors, follow steps 1 through 3 below:
the command ps -ax | grep inetd gives the process id of the inetd process. Use this process id to kill the process and restart it.
For example, if /clients/cpu2 is the directory containing, or linked to the root file system meant for the diskless client, this directory must be exported.
where <client_processor> is the diskless client processor importing the root file system from the server.
- Build diskless client configuration files, the SCMP-bootable image and the necessary start-up files:
The template file spec.tmpl is used to create the spec file for mkimage: ppc-x.netboot.spec, where x is the CPUID, which is 1 by default. This spec file can be edited to add/delete any item(s) from the RAM disk.
This asks a few questions in order to configure the diskless client's image. It creates the directory sys-1 where the kernel for the diskless client is copied.
For configuring and building images for multiple clients, one needs to specify the variable CPUID with the make command:
To manually boot the client processor, type the following at the firmware prompt of the client processor:
|
LynuxWorks, Inc. 855 Branham Lane East San Jose, CA 95138 http://www.lynuxworks.com 1.800.255.5969 |
| |
|
|
|